Difference between revisions of "Quick Installation Tool"
Jump to navigation
Jump to search
| (20 intermediate revisions by 2 users not shown) | |||
| Line 1: | Line 1: | ||
| − | + | Download and Install [https://files.coolremote.net/public/fw/CoolAutomationToolBox-2.1.0.exe '''CoolAutomation SW Package'''] | |
== Virtual COM Port Activation == | == Virtual COM Port Activation == | ||
| + | Starting from firmware version 0.4.4 CoolMasterNet implements a Virtual USB COM Port. If firmware update is required follow the instructions here: [[CoolMasterNet_FW_Update | CoolMasterNet FW Update]] | ||
| + | |||
* Tap the gear icon | * Tap the gear icon | ||
| − | [[File: | + | [[File:CM5-LCD-Gear.png]]<br> |
| − | + | * Select Configuration item | |
| + | [[File:CM5-LCD-Settings1.png]]<br> | ||
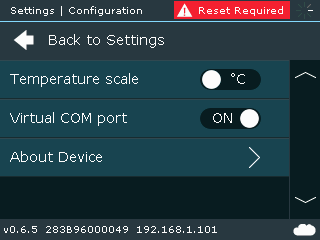
* Move the "Virtual COM port" slider to ON position | * Move the "Virtual COM port" slider to ON position | ||
| + | [[File:CM5-LCD-Configuration.png]]<br> | ||
* Restart CoolMasterNet | * Restart CoolMasterNet | ||
| − | |||
Once Virtual COM Port is activated, connecting CoolMasterNet to Windows or Linux PC via USB will bring up a COM Port Device on PC side. | Once Virtual COM Port is activated, connecting CoolMasterNet to Windows or Linux PC via USB will bring up a COM Port Device on PC side. | ||
Latest revision as of 03:56, 8 September 2023
Download and Install CoolAutomation SW Package
Virtual COM Port Activation
Starting from firmware version 0.4.4 CoolMasterNet implements a Virtual USB COM Port. If firmware update is required follow the instructions here: CoolMasterNet FW Update
- Tap the gear icon
- Select Configuration item
- Move the "Virtual COM port" slider to ON position
- Restart CoolMasterNet
Once Virtual COM Port is activated, connecting CoolMasterNet to Windows or Linux PC via USB will bring up a COM Port Device on PC side.


